Are you looking to add some extra length and volume to your natural curls? Do you want to experiment with different styles and achieve a fresh look? Wearing high quality clip-in extensions can be the answer you’re looking for. The best thing about opting for hair extensions is that you don’t need to spend so much time and money to achieve a flawless, natural look.
Blending your curly extensions with your natural hair can be a bit tricky, but with the right techniques, you can achieve that envy-worthy look. Here’s how you can confidently blend naturally curly hair extensions with your hair for a stunning and voluminous result:
Table of Contents
Step 1: Choose the Right Hair Extensions for Your Natural Curls
When it comes to blending clip-in curly hair extensions with your natural curls, it’s crucial to choose the right type of hair extensions that perfectly match your unique curl pattern. The texture, length and color of your natural hair will dictate the type of extensions you need to buy.
If your curls are tight and coily, opt for extensions with a similar texture to ensure a seamless blend. If you have looser curls, go for extensions that mimic that pattern.
The length of your hair matters too! If your curls are short, it’s best to choose extensions that are slightly longer to create a more natural look. But, if your natural hair is long, you can opt for extensions that are the same length or slightly shorter.
You also need to pay attention to the color of your natural hair. Look for extensions that match your hair color perfectly or go for slightly lighter shades for a highlighted effect. Avoid choosing extensions that are significantly darker than your natural hair, as this can make the blend appear unnatural.
It also goes without saying that the quality of your chosen hair extension can affect how easy or how hard it is to blend your extensions with your hair. Investing in high-quality extensions will not only ensure a better blend but also allow for longer wear. Look for extensions made of 100% human hair, as they can be styled and treated just like your natural hair.
By choosing the right hair extensions that match your curl pattern, length, color, and quality, you can achieve a flawless blend between your clip-ins and natural curls.
Step 2: Prepare Your Natural Hair for Extensions
Before attaching your extension, prepare your own tresses by detangling, moisturizing, and ensuring they’re free from any product buildup. Detangling is crucial to creating a seamless blend between your natural hair and the clip-in extensions.
Using a wide-toothed comb or a specialized detangling brush, you can gently comb through your hair. Take your time and be patient, start from the ends and work your way up to the roots.
After detangling, you need to moisturize your natural hair to prevent dryness or breakage. Use a leave-in conditioner or a moisturizing spray and apply it evenly throughout your hair. This will help keep your natural curls hydrated, soft, and manageable.
Freeing your hair from any product buildup is a crucial step too. Product buildup can weigh down your natural hair and make it difficult to blend with the extensions. To remove buildup, use a clarifying shampoo or a mixture of apple cider vinegar and water. Massage the shampoo or the mixture into your scalp and rinse thoroughly.
These steps will help create a smooth and natural-looking blend, allowing you to rock your new hairstyle with confidence.
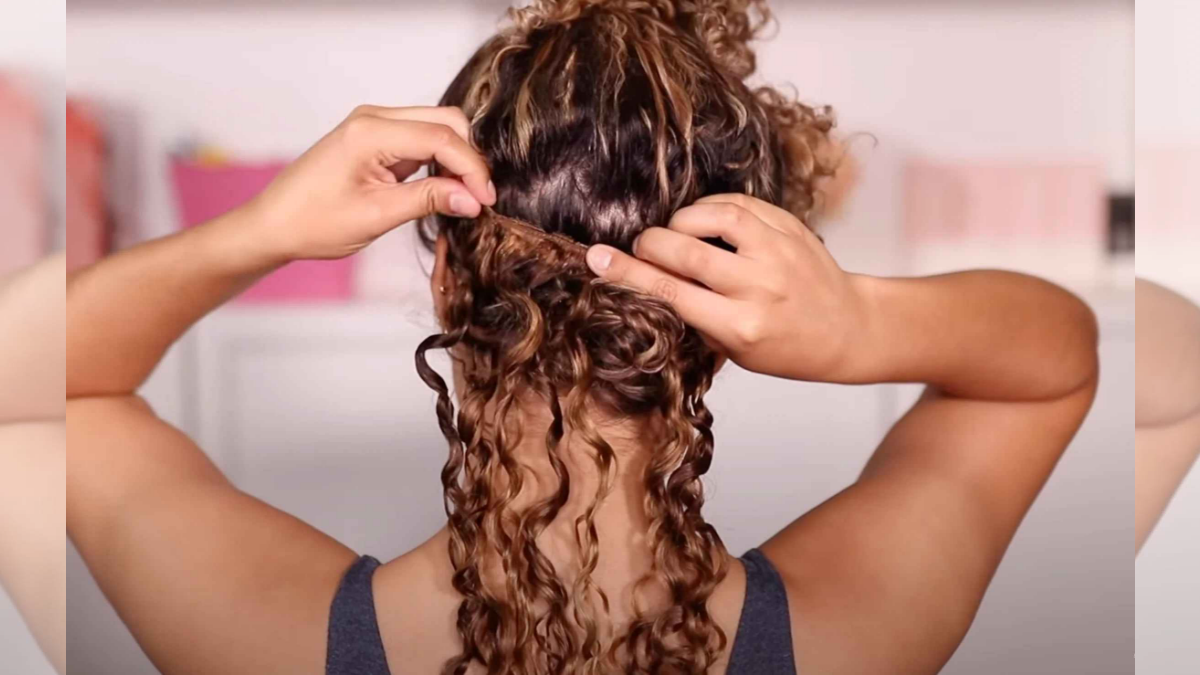
Step 3: Properly Clip in Your Curly Extensions
To ensure a flawless and effortless application, it’s essential to master the proper technique for attaching your luscious curls. When it comes to clip-in curly hair extensions, there are a few key steps you need to follow for a seamless blend with your natural hair.
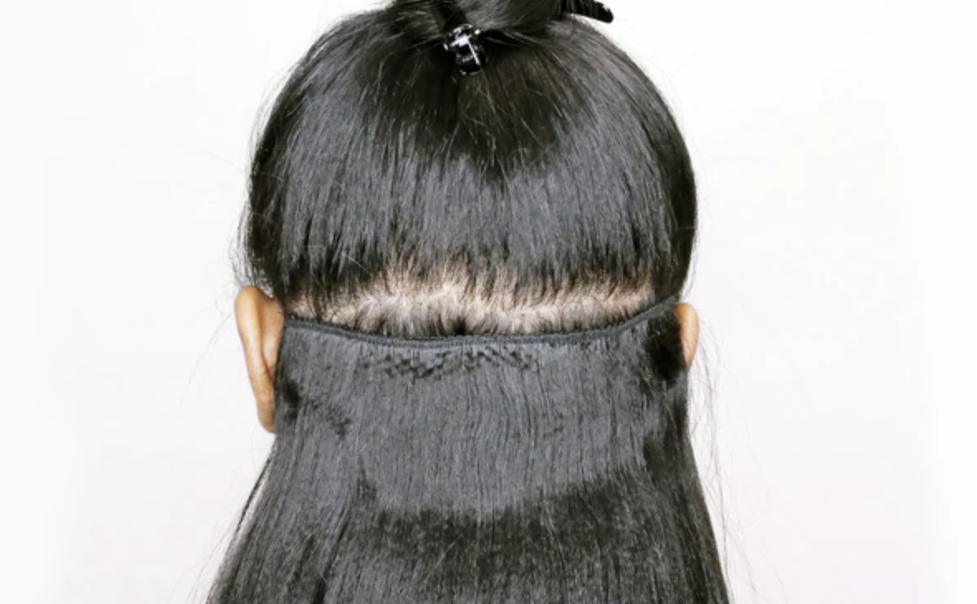
- Start by sectioning off your hair.
Use a comb to create a horizontal parting at the back of your head, about an inch above the nape of your neck. Clip up the rest of your hair to keep it out of the way.
- Take one weft of the curly extension and position it at the root of the parted section.
Make sure the clips are facing down towards your scalp. Snap the clips shut, ensuring they’re securely attached. Continue this process, working your way up towards the crown of your head. Remember to leave a small section of your natural hair out at the top to cover the wefts later on. This’ll create a more natural and seamless look.
- Once all the wefts are in place, gently tousle your hair to blend the extensions with your natural curls.
Use a curling iron or wand to further blend the hair and create uniform curls throughout. This step is crucial to achieving a natural-looking finish.
Step 4: Blend the Extensions with Your Natural Curls
Using your fingers or a wide-toothed comb, loosen any tight curls or knots in your natural hair. This will help create a smooth base for blending.
Then, take a small section of your natural hair and a corresponding section of the extension. Hold them together at the roots and twist them around each other, working your way down to the ends. This technique will help the extension blend seamlessly with your natural curls. Repeat this process throughout your entire head, making sure to blend the extensions with your own hair from root to tip.
To add even more dimension and blend the extensions further, you can use a curling iron or wand to create soft curls or waves. Wrap small sections of your hair and the extensions around the barrel, holding for a few seconds before releasing. This will help the curls from the extensions blend with your natural curls, creating a cohesive and natural look.
Once you have finished curling and blending, use your fingers or a wide-toothed comb to gently separate and fluff your curls. Finish off with a light hairspray to set the style and ensure your blend lasts all day.
Maintaining and Caring for Your Blended Hair
Keep your blended hairstyle looking fabulous by following these simple maintenance and care tips.
1. Wash your hair extensions using a sulfate-free shampoo and conditioner
Sulfate can strip natural oil from your hair, so you need to avoid it at all costs. After washing and applying conditioner, make sure to thoroughly rinse your hair to avoid product buildup.
2. Air dry your curly hair.
When drying your hair, gently squeeze out excess water with a towel and let it air dry. If you really need to dry your hair immediately, use a diffuser on a low heat setting to prevent damage.
3. Detangle your hair gently.
When detangling your hair, start from the bottom and work your way up using a wide-toothed comb or your fingers. Avoid brushing your hair when it’s wet as it can cause breakage.
4. Be mindful of the heat.
When styling your hair, be mindful of the heat. Use heat protectant sprays before using hot tools such as curling irons or straighteners. Opt for low to medium heat settings and avoid applying direct heat to the clip-in attachments.
5. Avoid any unnecessary tugging or pulling.
When removing your clip-in curly hair extensions, it’s important to be gentle and avoid tugging or pulling. Start by locating the clips and opening them one by one, starting from the bottom and working your way up. This will prevent any damage to your natural hair.
6. Store your hair extensions properly to maintain their quality.
Keep your extensions in a cool, dry place and avoid exposing them to direct sunlight or moisture. Use a satin or silk scarf to wrap your hair before going to bed to prevent friction and tangles.
There you have it! Blending clip-in curly hair extensions with your natural hair is a great way to enhance your curls and achieve a seamless, natural-looking blend. Applying your extensions doesn’t have to be that hard, if you know these techniques.
Remember to take care of your blended hair by maintaining and caring for it properly. Enjoy your gorgeous, blended curls until you feel the need to try another hairstyle!